Wednesday, October 05, 2005

Starship Troopers - Blister Bugs


I have no idea why I bought these. I should have used the money to buy more Firefries - but I had a lapse in judgement and grabbed these instead. Maybe it was to bulk up my collection and to be able to field 3000 points worth of stuff at Priority Level 2. Who knows, but now I'm stuck with them.

For the paint job, a base coat of the cheap Flat Black Wal-Mart spray paint. Then, drybrushed everything with Delta Ceramcoat Crocus Yellow followed by a light drybrush of DC Bright Yellow. For the claws and body markings, DC Bright Red. For the eyes, DC Midnight Blue. Then a final wash of Games Workshop's Chestnut Ink - 1 part ink & 4 parts water.

Starship Troopers - Firefries


These are the best in the SST miniatures line, so far. Cheap to build a unit, easy to clean - if needed and a snap to put together - only 4 pieces per bug!!! And in games, they have struck fear and destruction for MI players. Any bug player should at least pick up a couple of boxes and give them a try.

For the paint job - base coated with cheap Wal-Mart Flat Black. Then for the body, I drybrushed Delta Ceramcoat Poppy Orange then DC Pumpkin. For the claws and stingers, DC Bright Red. For the eyes, DC Bright Yellow.

Tuesday, October 04, 2005

6mm vs. 10mm Experiment


Now that Warmaster Ancients is out, I've been itching to play game. Down in Savannah, it looks like I'm the only torch bearer, so it looks like I'll have to paint up 2 opposing armies. 10mm is the "standard" for Warmaster (like 15mm for DBx), but I was curious about 6mm. About 10 years ago, I first attempted 6mm with GW's Space Marine and failed horribly. But seeing how I could field 2 armies cheaper by using 6mm figures was enough to inspire me to try it again. Hence, the reason behind the 6mm vs. 10mm experiment!

Having painted up a stand for Warmaster Ancients, both in 10mm (using Pendraken figures) and 6mm (using Baccus figures) has allowed me to see some differences - other than size & cost! I like the freedom of painting as much or as little of the details of the figures. I find that I have more freedom with 6mm than with 10mm. And when armed with a small brush, I can breeze through the 6mm. With the 10mm, I found myself deciding if I was going to paint a sleeve either as armor or as a tunic. Plus, with the larger scale I found that I had more flesh to paint - mainly the legs. I was going crazy with having to paint the front and sides of the legs.

So for now, my choice is to do the Punic Wars in 6mm for Warmaster Ancients. Time and cost were the deciding factors.

10mm Republican Roman Hastatii


Finally! It's been a while since I've touched these. SST & Warmachine got in the way, but I did finish these up today!

For the colors, I used the same paints that I used for the 6mm figures. The time per figure was 3 minutes a figure. The increase in size was easier to paint in some instances (like the spears) and harder in others (like the flesh...ugh!).

The single castings made it easier to get to certain places on the figure, as opposed to a single strip. I'm sure that I'll run into mounting issues, though. I find that it's easier to mount a strip than individual figures onto a base.

Friday, August 26, 2005

6mm Republican Roman Hastatii


This is my experiment with painting 6mm. I started with a base coat of cheap Wal-Mart Flat Black spray paint. I then picked out the bits of flesh (face, arm & hand holding spear, legs) with Delta Ceramcoat's Fleshtone. I then painted the tunic DC Sandstone. The spear shaft is DC Spice Brown & the spear tip is DC Metallic Silver. DC Metallic silver is also used on the helmet, breastplate and shield. The helmet plume and shield body is DC Opaque Red. The base is DC Leaf Green.

I'm kicking around the idea of using 6mm for Warmaster Ancients and was curious if I could paint a figure that small. It helps to have a 10/0 brush and not worring about painting all the details. For my first attempt, I averaged 2 minutes per figure. I hope to improve on that, since a side goal of mine to be able to paint at this scale quickly.

Next up, 10mm Republican Roman Hastatii!

Wednesday, August 10, 2005

Starship Troopers - Brain Bug


Base coated with cheap Wal-Mart Flat Black spray paint. I then drybrushed Delta Ceramcoat's Spice Brown all over the Brain Bug. I followed up with a drybrush of DC Toffee Brown on the main body, brain sucker spike and underside of the bug, not touching the claws and face. The brain sucker also got a drybrush of DC Wild Rice and a touch of DC Black on the spike. For the face, I used DC Midnight Blue for the eyes and Wild Rice & Napthol Red Light around the mouth area.

The Chariot Bugs got a base coat of the cheap Wal-Mart Flat Black spray paint. I then drybrushed Delta Ceramcoat Storm Grey all over. I then drybrushed DC Bright Red on the top.

Tuesday, August 09, 2005

Starship Troopers - Tanker Bug


Base coated with cheap Wal-Mart spray paint, ColorPlace Flat Black. I then drybrushed 2 shades of blue all over the entire bug, Delta Ceramcoat Midnight Blue first, then Navy Blue on top of that. I then drybrushed DC Nightfall Blue everywhere except the back shell of the bug. I decided at the last minute to keep that dark - although I might change my mind later, but I felt that it should be darker than the upper body & head. On the claws, I used DC Cape Cod Blue, except around the mouth I used DC Bright Red. For the eyes, DC Wedgwood Green & for the head antenne, DC Poppy Orange just on the tips.

Starship Troopers - M8 Ape Marauder Suits


These were simple to paint. I started with a base coat of Krylon Camoflage Ultra-Flat Olive #8143. On the Claws & metal bits, I used Delta Ceramcoat Metallic Silver. For the Cockpits, first DC Metallic Silver then Metallic 14K Gold on top. For the base, DC Spice Brown.

I wanted to test out the camo spray paint, so I deemed these 2 as "grunts" for a Marauder platoon I'm working on. My plan is to paint the NCO & Sarge inside the Marauders and keep the canopys clear for those & paint over the grunts' canopys.

Saturday, July 23, 2005

Starship Troopers - Mobile Infantry


Power Suits: Base coated in cheap flat black spray paint from Wal-Mart, drybrushed Delta Ceramcoat Rain Grey, then Quaker Grey on the jumpsuit. Drybrushed DC's Christmas Green then Leaf Green on the armored bits, helmet and backpack. The guns get a 40/60 mix of DC's Black and Metallic Silver (shooting to match Games Workshop's Chainmail paint). The faceplates start with DC's Metallic Silver, then Metallic 14K Gold on top. NCO's and Sargents don't have faceplates, so DC's Fleshtone on the face and they're good to go. For the base, DC's Spice Brown.

The NCO's transmitter is the center portion of the shockstick, just trimmed down to look like some sort of transmitter.

Tunnel Markers & Tunnel Entrances

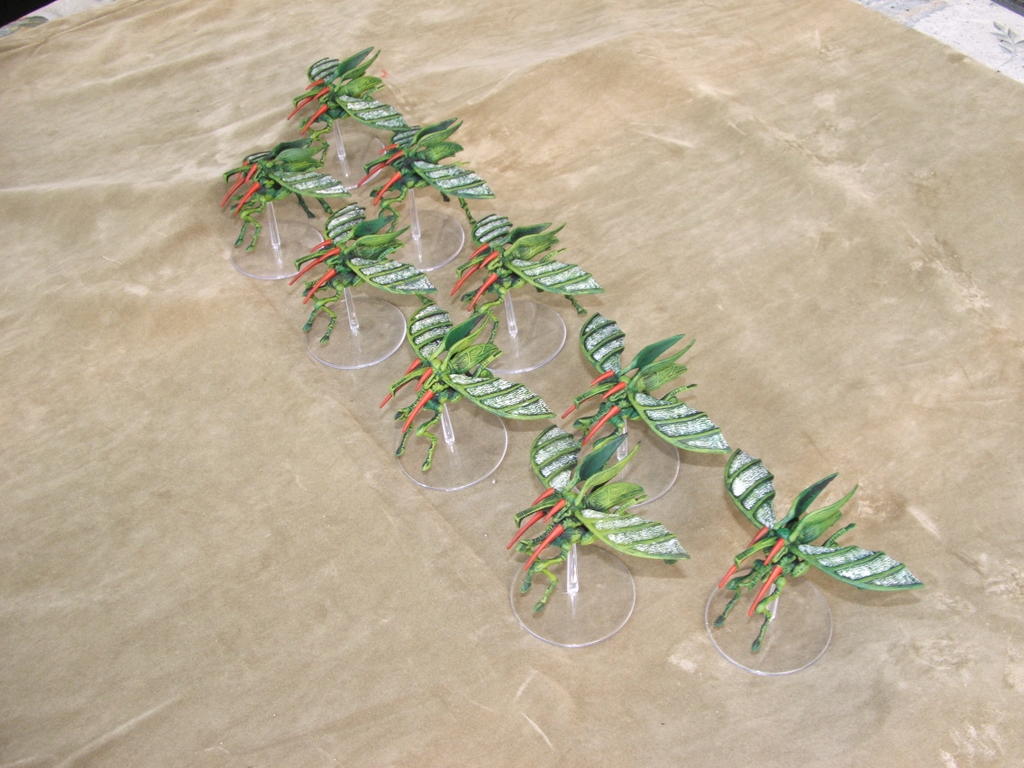
Inspired by the SST demo at Cold Wars '05 where the Mongoose Infantry member had made a Tunnel Marker from spare bits and uninspired by the cardboard markers and templates included in the starter box led me to create my own Tunnel Markers and Tunnel Entrances.

Tunnel Marker: I started with 2 spare legs (you get 1 spare leg from a 2 Warrior sprue) and a 1" washer. Trimmed the ball joints to lie flat with the washer and then superglued the legs to the washer using Dollar Tree Gel Super Glue (3 tubes for $1). After that had set, I then spread wood filler, straight from the tub, onto the washer to make it look like that the legs were poking through the ground. I let it set overnight - mainly because I did this after dinner and before going to bed. The next day - a base coat of the cheap flat black spray paint from Wal-Mart, the usual treatment on the bug legs (see an earlier post on how I painted the Arachnid Warriors) and for the ground, drybrush Delta Ceramcoat Spice Brown and then a light drybrush of DC's Bambi Brown (you've gotta love the names of these colors).

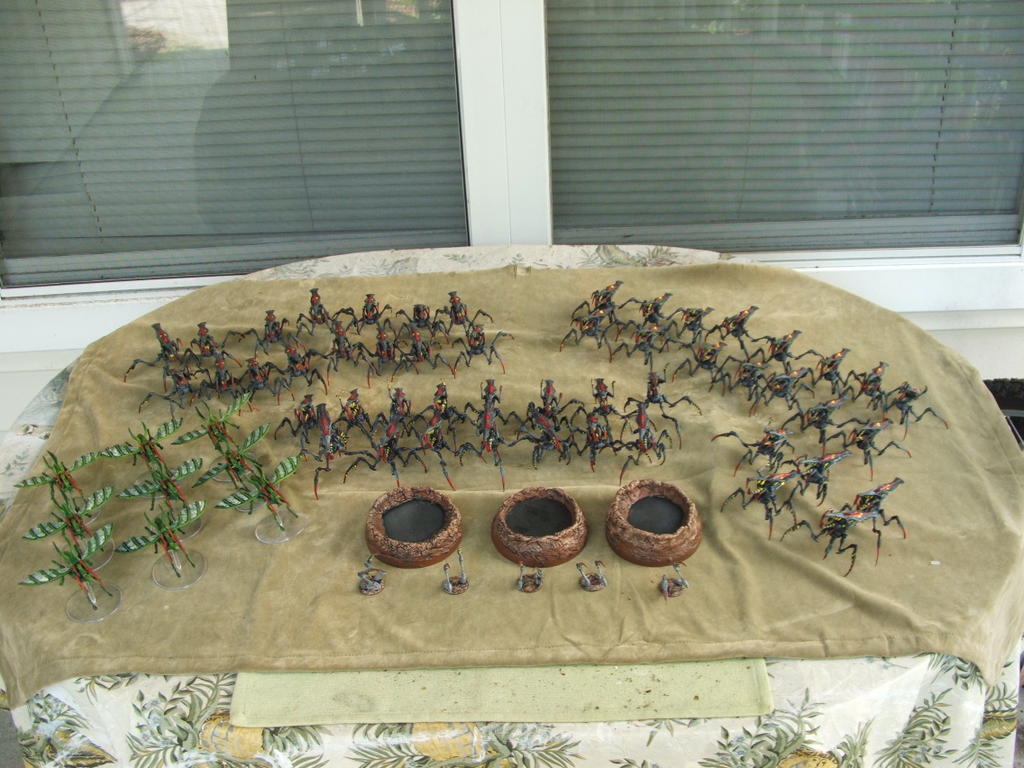
Tunnel Entrance: In SST, a Tunnel Entrance & a Nest Entrance is 4" in diameter. Now a regular CD from AOL is just too big. At Michael's, I found 4" diameter wood plaques for a mere 50 cents each. So I bought about 10 of the things, and whipped up 10 entrances. I added straight wood filler around the edges to give it height. You'll have to go back and reform your tunnel walls 2-3 times as the filler sets, if you're working on 10 at the same time. You'll feel it start to get firm and then you'll know if you'll have to go back to it again or not, but do keep an eye on it. You certainly don't want to have "flat" tunnel entrances. After the wood filler sets, a base coat of cheap flatr black spray paint from Wal-Mart, a drybrush of DC's Spice Brown, followed by a light drybrush of DC's Bambi Brown around the edges of the entrance. Althought I have yet to do so, I'm going to add a spare bug leg or two to a few entrances to signify them as "Nest Entrances".

Arachnid Unit Markings


It can get confusing trying to figure out which bugs belong to which unit when there are 50 of them on the board. I've put markings on the heads to tell the units apart at a glance.

Hopper Bugs


Here's more pictures of the Hoppers

Starship Troopers - Arachnids

Here's what's I've painted up so far for the Arachnids: 9 Hoppers and 50 Warriors. 20 of those Warriors were painted by Steve Barrett. Those are certainly the better painted ones! He's very skilled and you can see it all of the figures he paints, plus he's retired - so he's got plenty of time to paint! Unlike me, who goes for the quickie paintjob to get it on the table to play with.

For the Warriors: base coated with the cheap flat black spray paint from Wal-Mart (ColorPlace is the brand), drybrushed Delta Ceramcoat Storm Grey all over the bug. Then, used DC's Bright Red on the claws, jaws, legs and top of the head. Also used DC's Bright Yellow for the stripes along the legs & jaws. I used the same yellow for unit markings on the bugs. I have yet to put a finish coat on these bugs, the humidity is too high in South Carolina now. I'll wait until the Fall.


For the Hoppers: base coated with the cheap flat black spray paint from Wal-Mart (less than a $1 a can), drybrushed Delta Ceramcoat Christmas Green (it's a nice dark green...I know, I hate the name too) all over the bug - wings too, then drybrushed DC's Leaf Green over that. Then, used DC's Bright Red on the claws & jaws. And for the wings, I drybrushed DC's Antique White. If I didn't want to get too close to the edge of the wing - I just left it and the green that I drybrushed on before keeps it looking halfway decent.

Hive Tyrant & Carnifex


I've actually had the Hive Tyrant somewhat put together, but never painted it until I got to South Carolina. I've had the thing for about 3-4 years, I think. Here's my quick tip - to get the wings to fit onto the shoulders of the tyrant, I didn't use "green stuff". Instead, I used 2-part epoxy putty that I got at the local Lowe's for $5. It sets fast, so you have to work quick, but it sure is cheaper.

Biovores & Lictors & Zoanthropes


As you can see, the Lictors & Zoanthropes are new additions. My older models didn't make it down to South Carolina during the move. I'll finish off those bases soon...

Tyranid Warriors & Ripper Swarms


Spinegaunts & Hormagaunts

32 Spinegaunts & 32 Hormagaunts, who could ask for anything more...

Tyranids & Genestealers


Here's the gist - I base coated everything in white and then used Games Workshop's blue inks for the most part. I say inks, because back then GW had a nice turquoise. It made it easy to get the Rouge Trader "3 Color" requirement. Unfortunately, GW has stopped making the turquoise ink. The occasional tounge or tentacle got pink instead. As a finish coat, Minwax PolyShades Classic Oak Satin #370 was brushed on.


These are old school Genestealers from the Space Hulk boardgame. I've got 24 of these babies.


Purpose

I find that as I'm growing older, I'm beginning to forget things... like what color of paint I used for a piece of clothing on a figure. Thus, I'm hoping to use this blog as a resource for myself and if if helps others...so be it!